

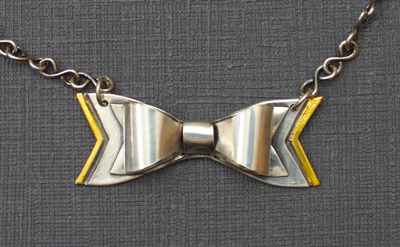
Art Clay Silver Paper Type - Bow Tie Pendant Tutorial
Project Level: Intermediate
Materials:
A105 - Art Clay Paper Type
A273 - Art Clay Silver Clay 10g
A285 - Art Clay Silver Paste Type
A280 - Art Clay Silver Syringe
R043 - Art Clay Klum Boo Gold Foil
Tools Needed:
0933SET - Swann Morton Scalpel Set
SKU21201 - Badger Balm
3522TL-H - Clear Acrylic Roller
SPACSET - Spacer set
COMBTOOL - Clay Shaper and Brush Combination Tool
337308 - 3M Polishing Papers
ACSSPAT - Spatular Tool
F134 - Drill Bit Set
PIN-224.00 - Swivel Pin Vice
D011 - Fibre Blanket
TS696669 - Cross- Action Tweezer
DG025 - Brass Brush
CRV-101 - Tissue Blade
R036 - Agate Burnisher
F038 - Liver of Sulphur
F037 - Baking Soda
337020 - Pro Polishing Pads
Needle Tool
Teflon sheets
Sanding pad
Micro Carving Tool
Tracing paper
Instructions:
Step 1: Start by sketching out a pattern for the bow on plain white
paper or print a free template available online. The loop section should be approximately 3” in
length as shown.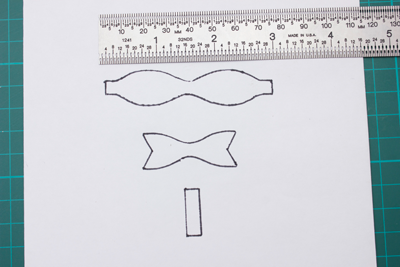
Step 2: Cut out the sections of the pattern and place them in an
economical arrangement on a sheet of Art Clay Silver Paper Type. Use a needle tool to scribe around the
templates and then cut out the shapes with a sharp scalpel or a pair of
scissors.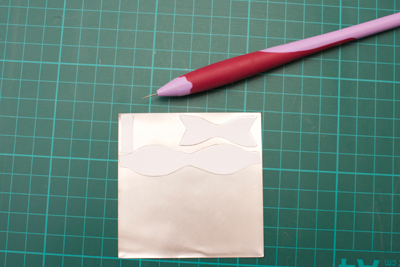
Step 3: Enlarge the tail section of the paper pattern by 25%, this
larger tail template will be used to create a sturdy backplate for the paper
clay bow to sit on.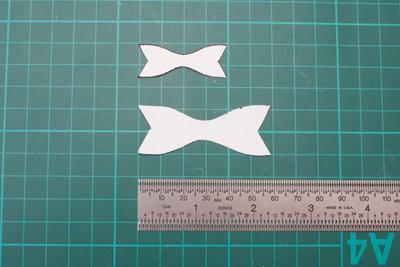
Step 4: Lubricate a non stick work surface with some badger balm or cool
slip. Roll out a 10g lump of Art Clay
Silver to a depth of 1mm, using spacer bars or stacks of 4 playing cards on
both sides as a guide to ensure an even sheet of clay.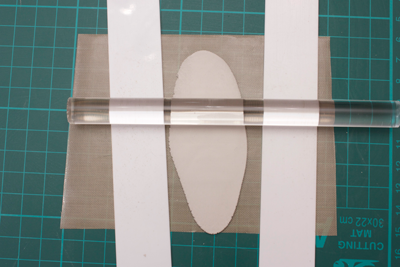
Step 5: Rub badger balm over the surface of the larger tail template to
help it stick and place it onto the rolled out sheet of clay. Cut around the template, roll up the clay off
cuts and reserve them for later use.
Gently lift the paper template off the clay and set this section aside
to completely dry. This can be done
quickly in a dehydrator, on a hotplate, in a domestic oven on a very low heat
or left to air dry for a few hours.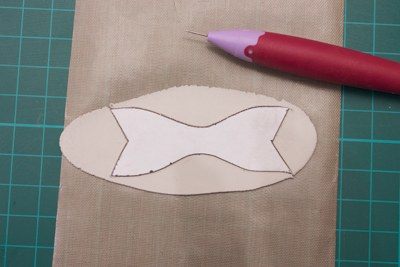
Step 6: Whilst the backplate is drying, create the bow from the cut out
sections of Art Clay Silver Paper. Add a
small amount of Art Clay Silver paste to the centre of the loop section of the
bow. Do not add any water to the paper
clay as it will dissolve.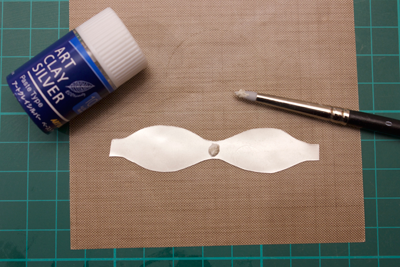
Step 7: Curl, don’t fold, both ends of this section in towards the
centre and press the ends down with a clay shaper tool. The bow should be
rounded and 3 dimensional. Hold the ends in place for a couple of minutes until
they are adhered and then set it aside to dry.
Do not attempt to dry the paper clay type with heat as this can cause it
to flake or crack.
Step 8: Check that the backplate is plaster dry and refine it with
sanding pads, 3M polishing papers or a baby wipe until you are satisfied that
it is perfectly smooth and will fire to a good finish.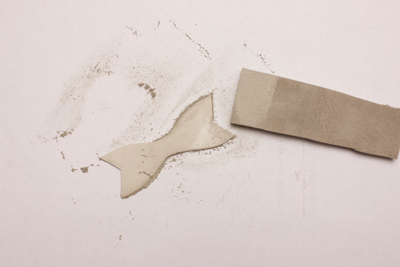
Step 9: Attach the paper clay tail to the backplate with a little paste
or some Art Clay Silver syringe type clay.
Pipe a thin line of syringe clay along the centre of the pendant and
attach one end of the small rectangular piece
of paper clay to it, leaving the other end free. Press it in place with a clay shaper tool.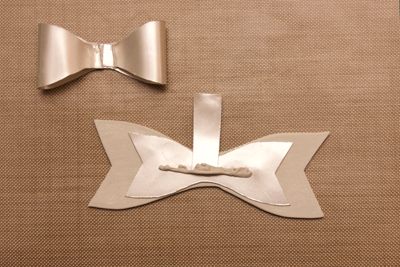
Step 10: You will need to work
quickly to ensure that the syringe clay does not dry out and does not dissolve
the paper clay. Pick up the bow section and place it centrally onto the
backplate. Use a clay shaper tool to
press down the centre to secure.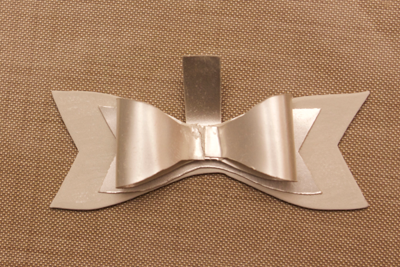
Step 11: Curl the rectangular
section over the middle of the bow and use a spatular tool to tuck in the free
end. Set the project to one side and
allow it to fully dry.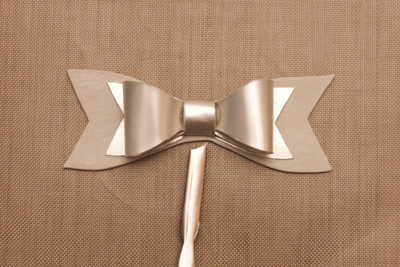
Step 12: When the pendant is dry, use a carving tool to etch lines into
the ends of the backplate of the design, mirroring the bow tail shape. Carve
approximately 2mm away from the edge to allow space to keum boo the design
after firing.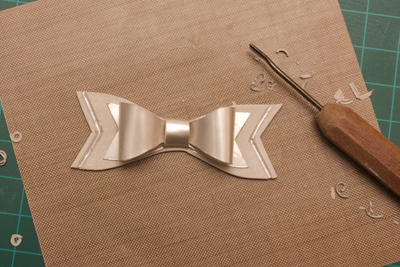
Step 13: Place the pendant onto a cork mat and use a 1.5mm drill bit, in
a pin vice, to drill a hole on each side to accommodate a jump ring. Do not drill too close to the edge of the
design as that could cause the pendant to crack.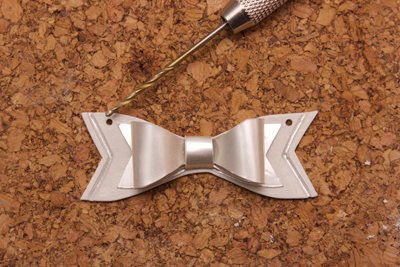
Step 14: Prepare the pendant for
firing by packing the loops of the bow with small rolls of fibre blanket. This will support the dimensional aspect of
the clay during the firing process and prevent the loops of the bow from
slumping. Fire the piece in a kiln at
800 degrees c for 30 minutes. Remove
from the kiln with an insulated tweezer, quench and gently brass brush the
pendant in water.
Step 15: Place a sheet of Art Clay Klum Boo Gold Foil in-between tracing
paper. Measure out some thin strips of
foil that will fit perfectly into the edges created at the ends of each tail of
the pendant.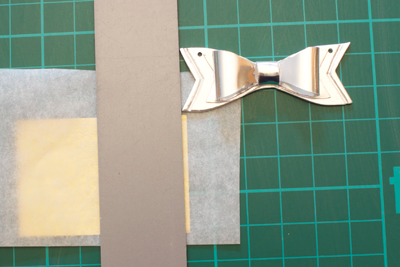
Step 16: Trim the gold foil with
a very sharp tissue blade, cutting it through the tracing paper for greater
control and to keep the foil free of finger grease.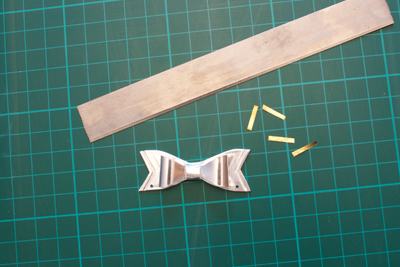
Step 17: Place the thin strips of gold foil onto the pendant and place
it into a kiln, preheated to 800 degrees c for 3 minutes.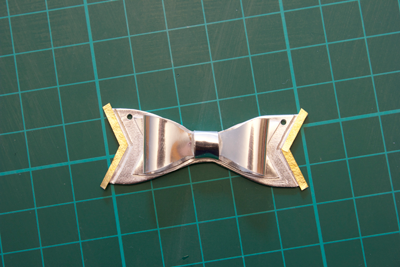
Step 18: Carefully lift the
pendant out of the hot kiln and place it on a heat proof surface. Tap the gold foil into place with an agate
burnisher to tack it to the surface of the silver and then quickly burnish the
gold until it bonds with the silver.
Allow the pendant to cool naturally and check that the Keum boo is
completely bonded and that there are no bubbles, thinned or missing areas. If there are bubbles, pop them with a pin and
smooth out the air. For thinned
sections, add small pieces of foil and repeat the process to fill the gaps.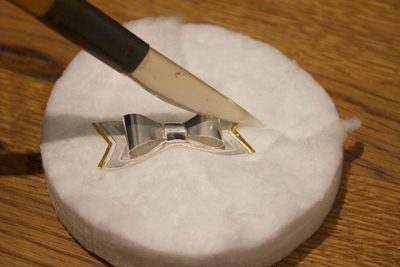
Step 19: Brass brush the entire pendant and polish it to a high shine
with 3m polishing papers, working through the grits from blue to mint.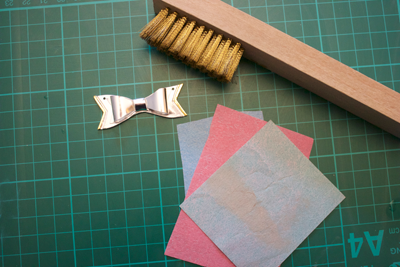
Step 20: Make up a
solution of liver of sulphur and dip the bow until it turns black. Add the silver to a solution of bicarbonate
of soda and water and leave it for ten minutes to completely neutralise the
oxidising effect. Take the pendant out
of the bicarbonate of soda bath and polish it with a pro polishing pad to remove the oxidisation from the high points of the
silver.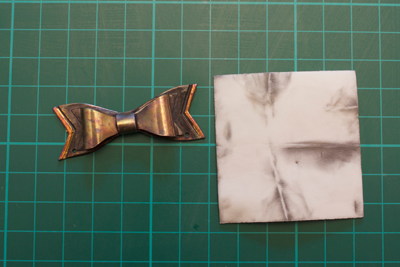
Step 21: Wash the pendant with
soap and water and assess the patina. If
necessary, perform a final polish with a clean pro polishing pad.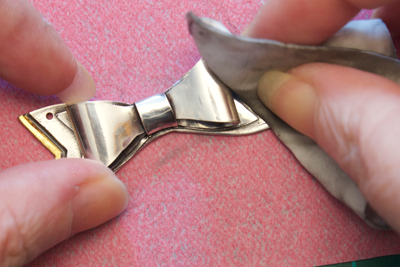
Step 22: Add a jump ring to either side and then attach a suitable chain
to complete the necklace.
See more of Nicola Beer's work at https://www.facebook.com/RubycurlsJewelleryDesigns/
