
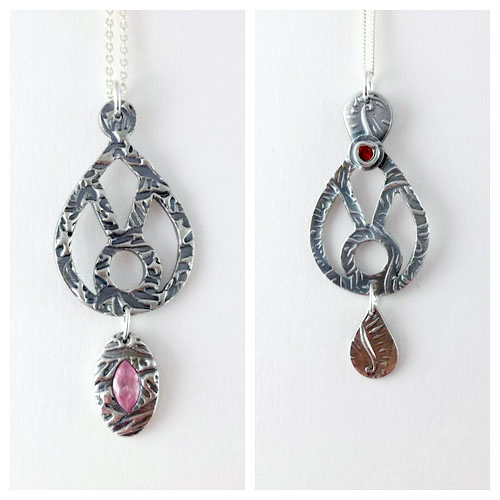
Summer Treasures Silver Pendant Tutorial
Project Level: Beginner to Intermediate.
Materials:
Art Clay Silver Clay 10g
Badger Balm
3mm Round Kiln Safe CZ
Marquise Kiln Safe CZ
XL Longlife Patina Gel
Tools Needed:
Clear Acrylic Roller
Spacer set (or playing cards)
Pam East Two Texture Mat No 7
#55179 - QuikArt Clay Saving Template
QuikArt Stylus Needle Tool Fine
Stainless Steel Tweezers
Stone Setting Burr 3mm
Brass Brush Medium
Economy Agate Burnisher
3M Polishing Papers
Pro-polishing Pads
Sunshine Polishing Cloth
Non-stick work surface
Instructions:
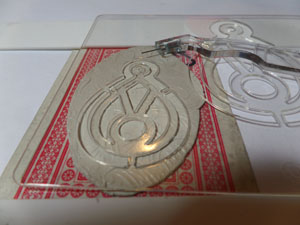
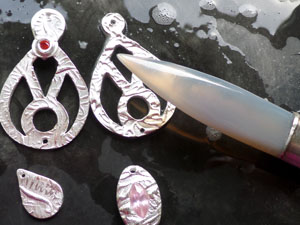
Step 1: Halve clay and wrap in cling film. Roll out both pieces separately. Roll the first piece to a depth of 6 cards thick. Turn by 90 degrees and roll to ensure that the template will fit over the top by both length and width. Lubricate the deep texture stamp with badger balm and place the rolled out clay on top.
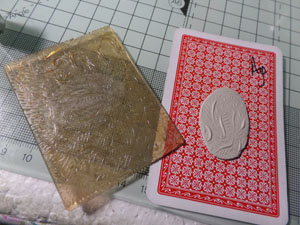
Place the rolled clay onto the texture and place 5 cards or spacers 1.25mm either side and on top of the texture. Alternatively, place the clay on the oiled work surface - place cards/spacers either side close to the clay and place the texture facing down on to the clay and roll on top of the texture stamp. *It is important to roll clay firmly in one direction only. Peel off carefully from the texture and lay clay onto an oiled playing card with the texture facing up.
Place 6 cards either side of the clay to support the template while cutting out. Oil the stylus tool, then hold it like a pen with the pin perpendicular to the clay. Work smoothly around all exterior and interior edges. Use the pin to pick out any excess clay. Carefully cut the joins of your clay with the stylus.
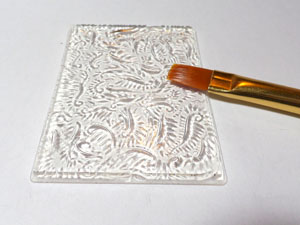
Step 2: Repeat Step #1 but this time, roll down to 5 cards thick and add the texture at 4 cards or 1mm. Use the Pam East shallow texture stamp.
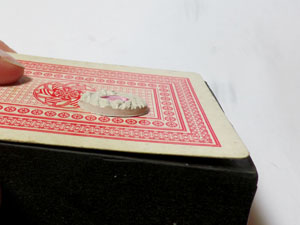
Step 3: Taking into account where you want to place jump ring holes, mark the holes with a cocktail stick while the clay is wet. Place both pendants on to oiled playing cards and leave to dry on a table or window ledge before placing on a hot plate or dehydrator. * Allowing them to dry naturally for 30-60 minutes prevents warping. 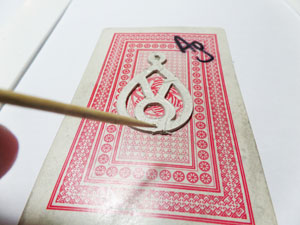
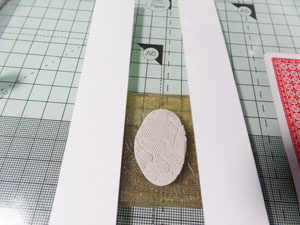
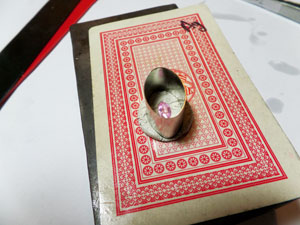
Step 4: To make a dangle for the pendant with the deeper texture, take the marquise and place it with the table of the stone facing down on your work surface. To gauge the depth of the stone from table to collet, build up an equal depth of playing cards or spacers on either side and lay a piece of Perspex or a snake maker over the top until the marquise doesn't move beneath it. The number of playing cards denotes the depth that your clay must be rolled out to including any texture in order to accommodate the depth of the stone. Lay out sufficient cards or spacers either side of a fresh piece of clay that will enable you to roll in the deeper texture stamp to a depth that will accommodate the CZ that you have just measured. This is the same as steps 1 & 2 but with more cards. Place piece on an oiled playing card, texture facing up. 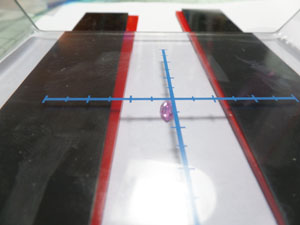
Step 5: Pick up the marquise with tweezers, collet (pointy bit) facing down and place in the centre of the clay. Tap it down with the tweezers until it is embedded evenly in the clay with the table just below the surface level of the clay. Oil an oval cutter and place it over the stone to centre it before pressing down vertically into the clay. Lift it out cleanly without wiggling. Again, mark any places where jump rings are needed with a cocktail stick. Dry as per step 3. 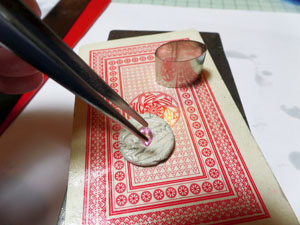
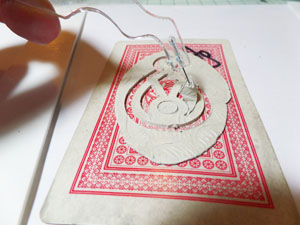
Step 6: When the pieces are bone dry, take the thinner pendant with the shallow texture and carefully remove the loop at the top with a scalpel. Using sanding pads, round off the edges at the top of the teardrop shape of the pendant. Round off the smaller piece with the hole in it until it is circular. When both pieces are smooth and re-shaped, dampen the back of the circle piece and the top of the pendant and join them together with a small amount of syringe clay. Press firmly together and then clean up any excess paste with a damp paintbrush. Dry until bone dry. 
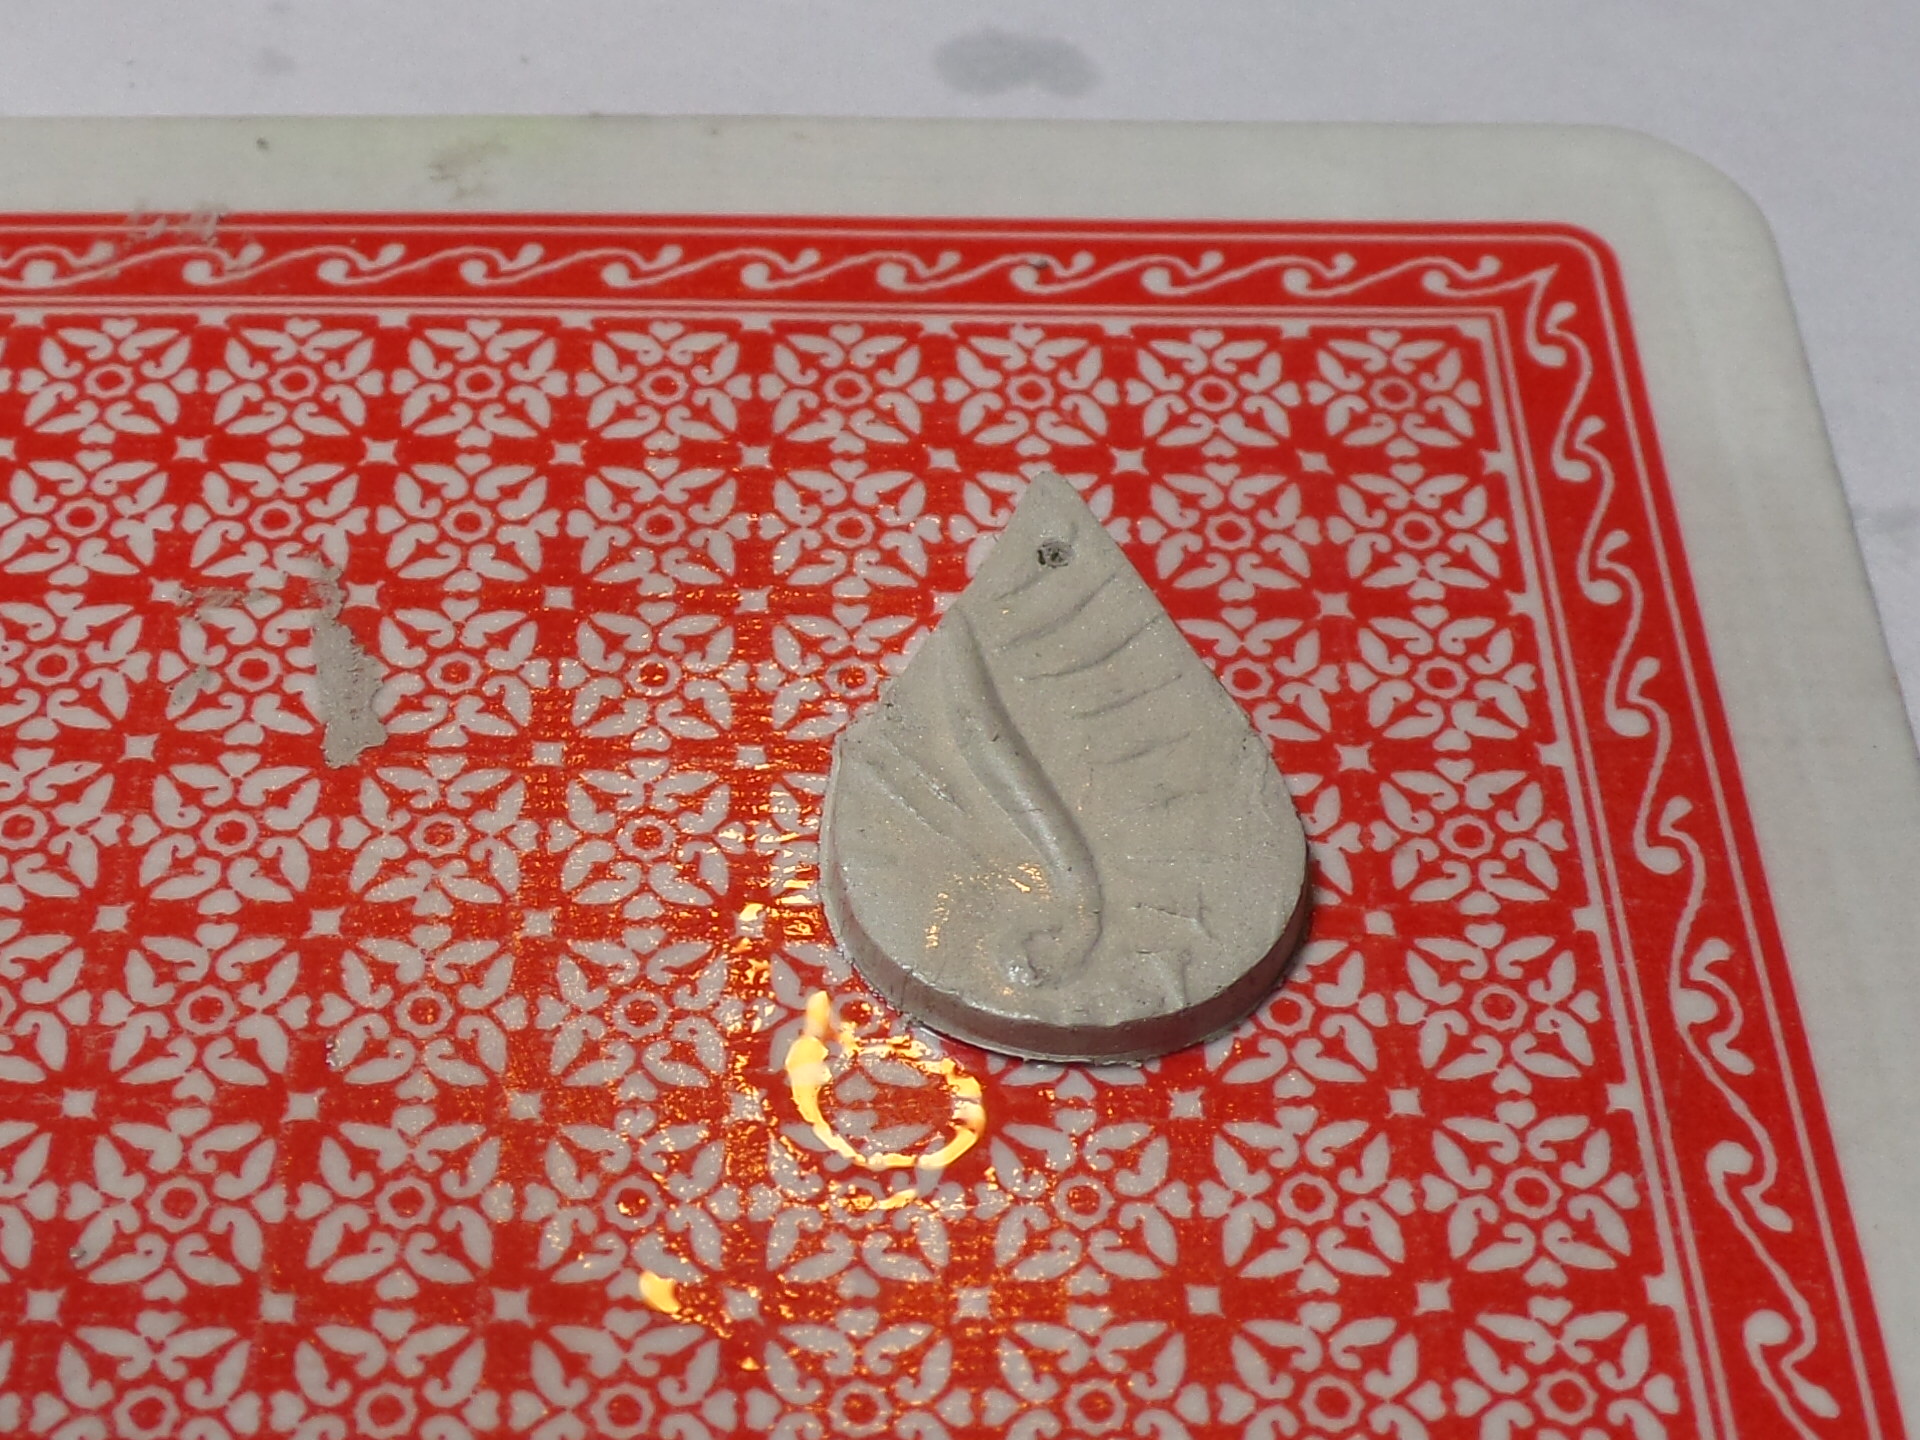
Step 7: Roll out the remaining clay to 4 cards thick on the shallow texture. Using a small teardrop cutter, cut 2 pieces. One will be a drop to hang from the pendant - a jump ring hold should be marked at the top pointed end. The second piece will be a hanger - a hole should be centrally marked in the rounded portion. The pointed end will be attached to the back of the pendant at the top. Dry both pieces.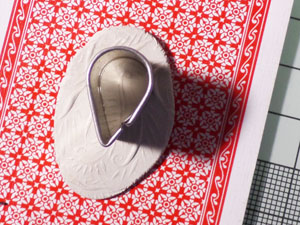
Step 8: Attach the hanger by dampening the top surface of the pointed tip with a damp paintbrush and dampening the back of the pointed end of the pendant. Join with syringe. Clean the joins and dry thoroughly.
Step 9: Take a 3mm round CZ and set into the round washer at the top of the pendant, in front of the hanger by either of these two methods:
(a) Drill a hole using a 3mm stone setting burr until the stone sits below the surface of the clay. Dampen the hole with water. Settle the stone in firmly, ensuring it is level. Dry again. 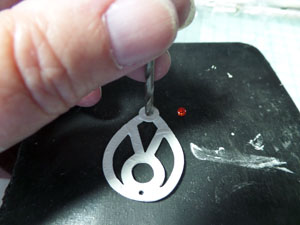
(b) Syringe a generous blob of paste into the centre of the washer, taking care not to introduce air bubbles. Place the CZ in the centre paste and press down gently, keeping it level and below the surface of the paste. Dry again.
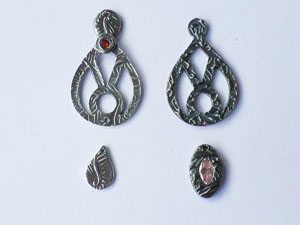
Step 10: Sand all sides of both pendants with sanding pads, working from coarse to fine until they are completely smooth. Work carefully inside the negative spaces with mini files and sanding sticks or tear off a tiny piece of fine sandpaper. Insert a 1.2mm bit into the pin vice and drill holes for the jump rings. Clean both CZ's first with dry cocktail sticks to remove any clay adhering to the stones. Finally, clean the stones with a cotton bud dampened with a tiny amount of white spirit. 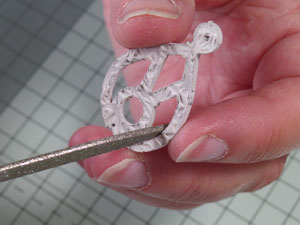
Step 11: Art Clay Fine Silver has a wide range of firing temperatures but for this project, I fired in my kiln at: full ramp to 800ºC, hold for 1 hour. Allow to cool naturally and do not quench! Quenching could cause the CZ stones to shatter. Place on a kiln shelf. 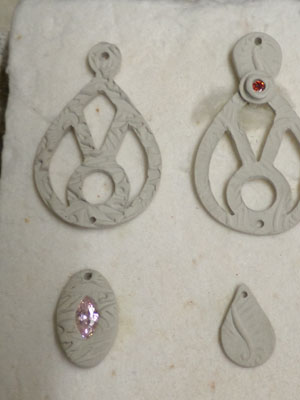
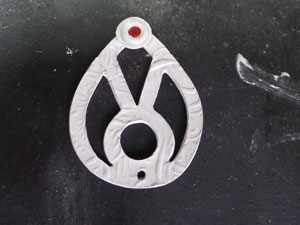
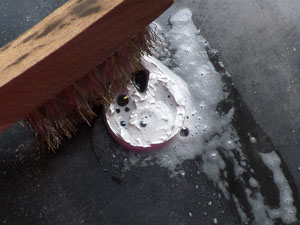
Step 12: To finish both pendants, brush briskly with the brass brush, dipping it in water and washing up liquid. Use an agate burnisher to really flatten all prominent surfaces and bring up the shine. Polish with 3M polishing papers, going from corse to fine. 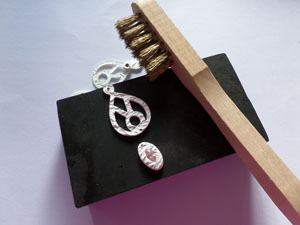
Step 13: Oxidise with liver of sulphur. Prepare some old glass dishes as follows:
(a) Hot water and washing up liquid to degrease the pieces.
(b) A few tablespoons of hot water with some XL Gel, stirred in with a cocktail stick - it should be a dark yellowish colour when dilluted.
(c) Using plastic tweezers, take the pieces out of the hot dip and into the liver of sulphur bath. Watch as the colours change - keep lifting out to view progress. When it achieves the desired colour, lift out with tweezers and put into bowl of clean cold water to neutralise.
(d) Dry thoroughly on kitchen paper and buff the edges and high points firmly with Pro-polishing pads to remove some of the oxidisation to create highlights and contrast between the shiny top surfaces and the darker recessed parts of the texture.
(e) Give everything a final polish with a Sunshine cloth. 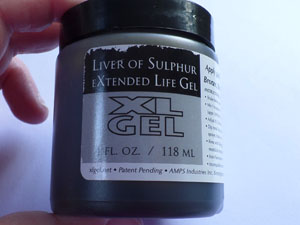
Step 14: Add jump rings and hang from chain, ribbon, cord as desired.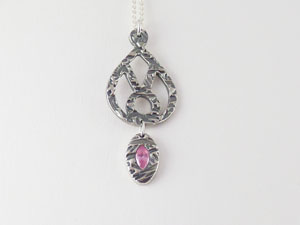
See more of Pat Wilson's work at: https://www.facebook.com/MetalclayNI/?pnref=lhc
